
Leeds Beckett University - City Campus,
Woodhouse Lane,
LS1 3HE
Deploy a test in Inspera
Page last updated:
This staff guide will show you how to deploy Inspera tests for on and off campus exams.
Inspera is currently available for use in the Law School and School of Health (Nursing courses), to service PSRB mandated requirements for academic integrity in examinations.
To set up an Inspera exam, you will first need to create an Inspera test link in your module, there are written and video guide instructions below.
You will then be able to apply a question set and test settings within Inspera.
Please note: If you have students who need to use Inspera Integrity Browser on a personal device AND students who need to use Safe Exam Browser on a University PC, you will need to create two Inspera links in the module to apply different security settings.
Learn how to set up Nursing exams in your module for off and on campus exams and apply SafeMedicate and MCQ templates and test settings within Inspera.
This staff video guide will show you how to create an Inspera link in your Ultra module.
This method uses the MyBeckett/Inspera integration. Student module enrolments will be imported into Inspera, meaning that students can access their Inspera test via SSO (single-sign-on).
a. Navigate to the location in your module where you would like to create an Inspera link.
b. Click the plus icon that appears when you hover your mouse cursor over this area.

c. Click Other Content & Tools.

d. Click the plus icon at the bottom right of the Inspera (Law and Nursing) box.
e. A link will be added to your module.

f. You will need to edit the name and description for the test. Click the 3 dots more.

g. Click Edit. At the top of the editing panel, you can click on the title to type a new name for the link. Ensure no special characters are used such as: %, <. /", etc. (to prevent issues downloading submissions later). It is also a good idea to include the date and time of the exam in the name e.g. Off Campus MCQ exam 01/10/25 at 10am.

h. If you want the marks to feed into Grade Centre, tick the box next to Create grade centre entry for this item. Please note: this setting must be enabled when creating the exam link in your module in order for the marks to sync from Inspera to Grade Centre.

i. Enter the Due date, marking units and points possible.

j. Click Save.
k. Click on the renamed Inspera link to launch Inspera and complete your exam set up within the Inspera system.

The instructions in this section continue on from Creating a test link in MyBeckett.
Inspera tests are based on question sets (a complete set of information pages and questions that can be reused in more than one test).
If you have not created (or co-authored) a question set for your test you must do this before continuing. Our guide to creating a test explains how to build a question set in Inspera.
a. Click the link that you have just created. The Inspera test setup page will open.
b. Click the folder icon in the Select question set box to choose the question set you want to use for this test.

c. Click Save.
Please continue to time and duration.
The instructions in this section continue on from Selecting a question set.
a. Complete the boxes for Test start time, Test end time and Duration.

- Test start time: Students will not be able to open the test and see the questions before the start time.
- Test end time: This is when the test will close.
- Duration: This is the length of time that a student will have to complete the test. It cannot be more than 8 hours.
For example: If a test opens at 9am and closes at 5pm and has a duration of 2 hours, students can start at any point between 9am - 5pm but will only have 2 hours to complete the test. In this scenario, if a student does not start the test until 4pm, they will be cut off at the end time of 5pm even though they have not used their full 2 hours.
b. You have the option to type some information about your test in the Test information box. This will be visible to students on their Inspera dashboard before the test. Information that students need to access during the test should not be added here.

For example: Welcome to the Semester 1 Assessment for MODULE NAME YY/YY.
Please continue to Test candidates.
The instructions in this section continue on Time and duration.
Test candidates will be imported into Inspera based on your module enrolments.
You will need to know the student IDs of the students who require extra time.
a. Click Manage to view the list of candidates attached to your test.

b. To add extra time for a student, tick the checkbox to the left of their ID. Click the Planned extra time option in the pop-up menu at the bottom of the screen.

c. Type Add extra time and enter the amount of extra time in minutes that the student requires. Click Update.

d. The extra time will display to the right of the student's ID.

Please continue to Options - general settings for information about other options.
The instructions in this section continue on from Test candidates.
- Oral exam: This should only be used if your test is fully oral (contains only the oral question type), otherwise students will not be able to interact with the test
- Enable auto submission (home exam): You can enable auto submission on tests without Safe Exam Browser
- Marking 2.0: A newer version of the marking tool
- Enable Candidate Report: The candidate report enables you to provide richer feedback to students. You can configure the report under the After test settings (see section below Options - after test).
To enable the Candidate Report:
a. Tick Enable Marking 2.0.
b. Tick Enable Candidate Report.
c. The Candidate Report will be available to students after marks have been confirmed.
d. You also have the option to add a date and time for the release of the Candidate Report. Please note: the marks will still need to be confirmed before the report is made available to students.

The instructions in this section continue on from Options - general settings.
Important: You cannot enable Safe Exam Browser (SEB) and Inspera Integrity Browser (IIB), for the same test. If you have students who need to use IIB on a personal device AND students who need to use SEB on a University PC, you will need to create two copies of the test in order to apply different security settings.
Follow the steps below if your students will be taking the exam using the Inspera Integrity Browser (IIB) on a personal device:
a. Tick the checkbox for Safe Exam Browser for PC and Mac.

b. Click Advanced Options.

c. Enter an Invigilator password (students may need to use this to re-enter the exam if they accidentally submit their work). The password can be any 5-8 characters alphanumeric string.
d. Enter a SEB password (this is the exam pin that your students need to enter at the start of the exam). It can be a maximum of 8 characters and contain at least one letter and one number.

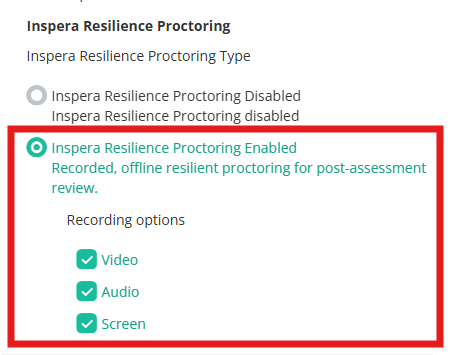
e. Tick Enable Inspera Integrity Browser. The Security Policy should default to Strict.

f. Select Inspera resilience proctoring Enabled.
If you would like to enable Turnitin Similarity report for your exam
a. Tick Request Similarity report.

b. You may need to accept Turnitin's terms and conditions the first time you enable this, click Accept.
The instructions in this section continue on from Options - general settings.
Important: You cannot enable Safe Exam Browser and Inspera Integrity Browser (previously Inspera Exam Portal) for the same test. If you have students who need to use IIB on a personal device AND students who need to use SEB on a University PC, you will need to create two copies of the test in order to apply different security settings.
Follow the steps below if your students will be taking the exam using the Safe Exam Browser (SEB) on a University PC:
a. Tick the checkbox for Safe Exam Browser for PC and Mac.
b. Click Advanced Options.
c. Enter an Invigilator password (students may need to use this to re-enter the exam if they accidentally submit their work).
d. Enter a SEB password (this is the exam pin that your students need to enter at the start of the exam). It must be 6 characters and contain at least one letter and one number.
If you would like to enable Turnitin Similarity reports for your exam:
a. Tick Request Similarity report.
b. You may need to accept the Turnitin terms and conditions the first time you enable this setting, click Accept.
The instructions in this section continue on from Options - security (off and on campus exams)
- Enable Text to Speech reading aid: This will allow all students to have the question text read out loud. Students can choose to enable or disable this feature through the options menu
- Enable Spell Checker: If enabled, this will be available in Essay questions
- Disable sketches in essay questions: The sketch tool in the Essay question type is a basic tool for drawing using the mouse. You can switch this off
- Show Lost Connection Alert: This is a notification that is displayed to students if their internet connection is lost for over one minute. You can customise the message, e.g. "It appears that you have lost your internet connection. You can continue to work and your submission will keep being saved in your browser's local storage. In the event that your connect cannot be re-established, please contact a member of your course team to report the issue."
This instructions in this section continue on from Options - exam day.
These settings control what marks and feedback your students have access to after a test is finished. You can change these settings at any time, except for Enable results page, which can only be set before you activate the test.
- Post-submission review: If you tick this option, your students will be able to log in to Inspera after their test and view their submission. You can also apply date and time restrictions to this setting
- Enable Results Page: If you tick this option, your students will have instant access to their test result in Inspera. You cannot enable this setting after a test has started
- Show achieved marks per question: If enabled, students can view their marks per question
- General feedback for assessment: This setting is only available if Candidate Report is enabled. This setting allows students to view comments and feedback made by graders during the marking process. More information is available in Inspera's guide to configuring the candidate report.
- Share comments with candidates: If enabled, students will be able to view comments on their test submission, as well as their correct answers.
- Allow graders to post comments to each other: If enabled, graders will be able to post annotations and comments to each other
The instructions in this section continue on from Options - after test.
General workflow:
- The default setting is Confirm all candidates at once. It is a good idea to use this setting so that you can release all marks at the same time
Setting marks and grades: You can choose between:
- Private marking and results alignment: Graders set marks privately, then share and align results before they are confirmed
- Shared marking: Graders mark collaboratively
Sharing marks and grades with committee:
- Allow completing Own Grades by committee: Recommended for marking committees with separate deadlines
- Require Own Grades to be confirmed across all committees: Recommended for marking committees with coinciding deadlines
Confirmation of marks and grades:
- All graders must confirm: This requires all grades to confirm Final Grades
- One grader can confirm: This allows one grader to confirm Final Grades on behalf of all graders
The instructions in this section continue on from Options - grading workflow.
- Enable administration of Explanations: If you tick this, three options will appear.
- Request explanations of grades: If selected, the status under the Explanation of Grades column in Monitor will be 'Requested' for all candidates.
- Allow graders to send explanations directly to candidates: If selected, instructors with a Grader role can send explanations to candidates.
- Set deadline for explanation: The graders will see this deadline as a reminder in the grading page, it can be changed at any time.
Once you have finished setting up the test you need to Activate it.
a. Click Next for further options for Design, Assessment settings and Activation.

b. You can review and edit the Design settings for the questions in the panel on the right. More information is available in the Inspera design settings guide.

c. When you have finished reviewing the Design section click Next for further options for Assessment settings.

d. In the Mark Scheme section select the appropriate grading scale that applies to the test.

e. Thresholds can be activated if there are no automatically marked questions in the test.
f. When you have finished reviewing the Assessment settings click Next to confirm test settings and Activate the test.

g. The Confirm tab shows a summary containing the following information:
- Test start and end time
- Question set used
- Test information
- Invigilator instructions
h. If no further changes are required click Activate test.

i. A pop up confirmation will appear, click Activate test again.

Activating the test will do the following:
- Make the test visible for the assigned candidates
- The test opens automatically at the start time
- Invitations will be sent to Graders that are added as contributors
- You can enable/disable the test but invitations to Graders will only be sent once
j. If you need to make further changes to the test before the start time, you can click Deactivate.

k. A pop up confirmation will appear, click Deactivate test again.
When you have finished editing the test, follow the steps above to Activate the test again.
You may find the following guides useful:
