Leeds Beckett University - City Campus,
Woodhouse Lane,
LS1 3HE
THE TEXT EDITOR | ULTRA
![]()
The Text editor
The Text editor appears when you are creating content such as documents and folders, but also when creating items such as discussions and assignments.

This section illustrates and describes the various menus that are available when you are creating content.
The Text editor can also help with accessibility issues (e.g. by using the text styles these can mark the sections which can be picked up by screen readers).
Text editor header menu
This is the purple tab heading the Text Editor menu on the left. Clicking on the pencil icon toggles the text editor menu to appear on and off:

Move enables you to move any associated content that has been created in the text editor. Clicking the icon expands into a menu with its options as seen below.
For example, a text document has an image attached and displayed with it and you can move it above or below the text content.

Block styling menu
This menu adds an icon before the text relating to its type. The second screen shot shows the Question icon added:

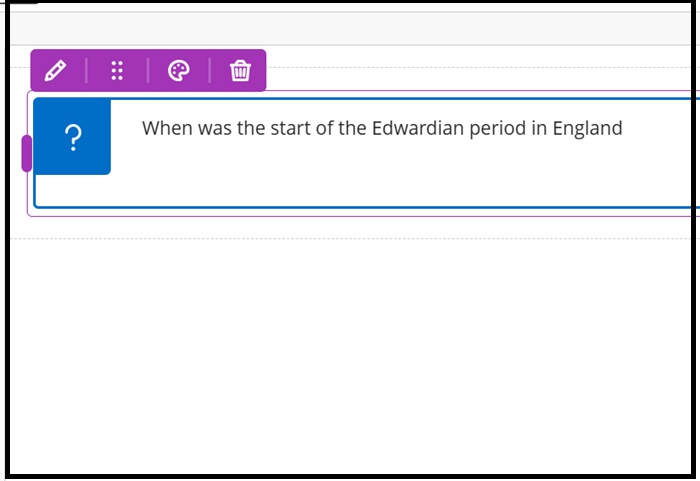
The formatting can be removed by clicking Reset Styling.
NB The Delete icon above deletes any content created but not the actual document.
The Text Editor menus
The below illustrates the left-hand side of the Text Editor menu and labels them from left to right.

Text Style
As mentioned in the above using these preformatted text styles may help with accessibility and screen readers:

The menu items Font and Font size are both self explanatory except that they are limited to a choice of 7 font styles and 7 font sizes (the smallest font is 10 point). The default font size is 14 point.
The next menu item is Colour picker where you have a choice of six font colours to choose from. Bold, Italic and underline are also common word processing features you would have encountered before.
Text options (The three dots menu as shown above)
If you click on this it will expand to show the functions in a toolbar which has more text formatting functions as can be seen below from left to right: strikethrough, superscript and subscript:

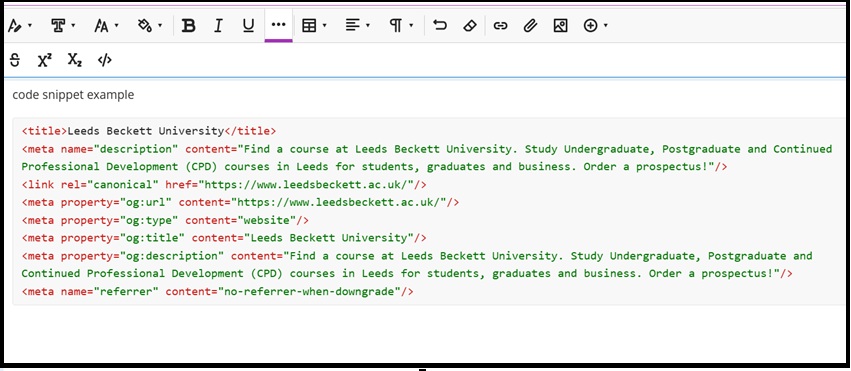
The last category is where you can add a code snippet in it's own box in the text area which shows the code syntax in colour (it currently supports 11 types of code Blackboard lists them here):
The below illustrates the right-hand side of the Text Editor menu and labels them from left to right.

Insert Table
This is where you can insert a table and clicking the table icon brings up the table options menu illustrated below by the labels going from left to right:

Alignment options are as in most word processors: Left/right align, centre and justify. This option applies only to text.
Lists
This menu contains formatting text as bulleted and numbered lists plus line height options and text direction. The default text direction is left to right as selected:

Please note: The bulleted and numbered lists are limited in Ultra in that you can't add a soft return in between a bulleted/numbered point to space the points out (e.g. create a bulleted paragraph point):

Using the tab key in a Numbered list will allow you to create lettered sub-sections:

Line height
The default Line height is set at 1.5 lines space with other options as double, 1.15 and 1 line.
Undo
A simple undo in whatever steps have been made since last saving your work.
Clear format
Applies when highlighting text to clear any formatting.
Link
Add a web link by typing in/pasting in a URL.
Attachment
This adds an attachment from your device. It will be added within the text editor's area and opened within there also.

If it is an image it will also be added within the text area.
Image
You can add an image from your device plus stock images from Unsplash and also generate images from a typed in search term. As in the above, it will also be added within the text editor's area.
Insert Content menu
Clicking on the Insert Content menu brings up a list of various items where you can add content:

Math
This item allows you to insert mathematical formulas into your document with preformatted notation and which has a toolbar menu of its own for the various mathematical functions:
Insert Image from URL
This enables you to insert an image from the image's own web link, URL, on a web page (i.e. not the link to the actual web page containing the image):

As in the above screen shot, right-click the image required and choose 'Copy image address' (Google Chrome method). Then from the Insert content menu choose Image from URL and paste the copied link into the Image URL box as seen below. In Alternative text add a description for the image and then click Insert:

Embed media
This function allows you to embed many types of media: audio, presentation as well as video in your document from a link (URL) to them. A full list of is contained on the Blackboard Help website here
It is a similar process to the above adding an Image form URL - i.e. copy and paste the link. However, the link is to the web page and the result is that you are embedding the item. In the following example this Soundcloud audio file has the player embedded into the document:

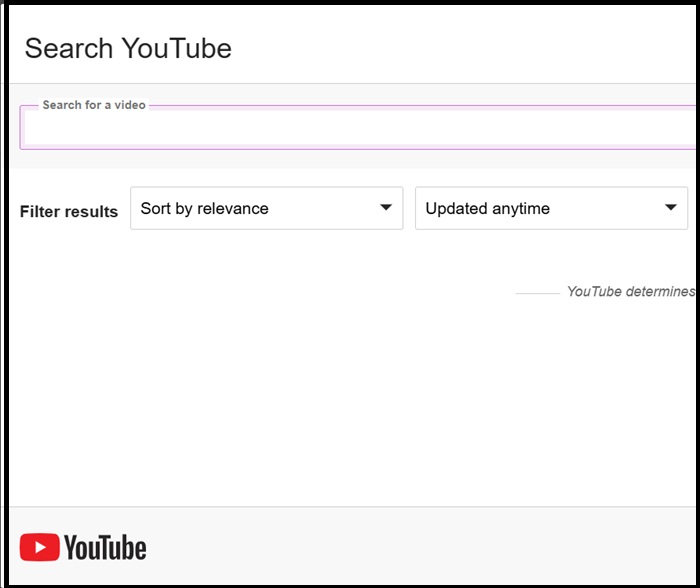
Insert YouTube video
This option leads you directly to the search YouTube Video dialogue box where you enter the content you require and select the video:
As in the above Soundcloud example this will embed the video plus YouTube player in the document.
Content Collection
This option enables you to add files from the Content collection:

Other Content and Tools
This option allows you to access Other Content and Tools if you wish for instance to add a link to an LTI tool such as Turnitin or perhaps more commonly, add a Panopto video within a document. At present, once added, deleting a Panopto video embedded in the document is only available by pressing the Backspace key:

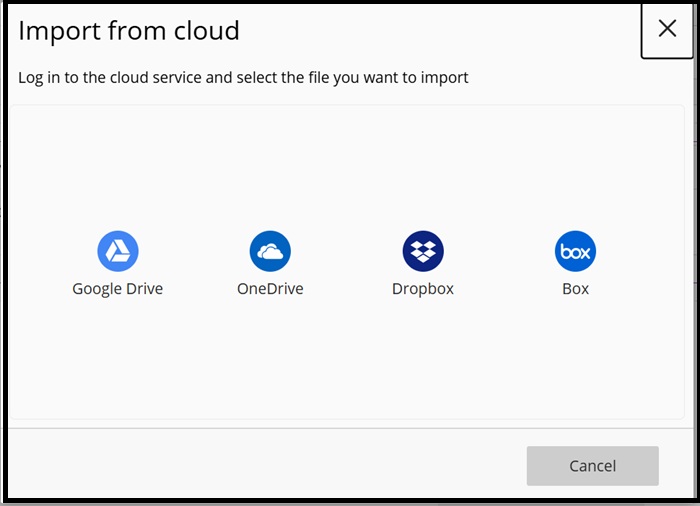
Cloud Storage
This will enable you to add files from Cloud storage locations such as One Drive, Dropbox etc.: