
Leeds Beckett University - City Campus,
Woodhouse Lane,
LS1 3HE
Create and attach a Grading Form
Page last updated:
You can use a grading form to structure written feedback against a set of criteria. This can help students to understand the marks you have allocated, as the grading form provides added detail.
There are two types of Grading Forms:
- Feedback only
- Feedback and marks
What do grading forms look like for markers?
Once the grading from is attached via the assignment settings, on opening a submission, it will appear in the feedback panel on the right of a student's paper.
In the example below, this grading form contains skills criteria under which instructors can leave written feedback (comments) and marks (out of set marks) in the boxes to the right of each criterion and this is then added as you mark to the total. On completing the marking simply select the button Apply to Grade to commit the total mark. This will be visible to students after the Feedback Release Date has passed.
If a Feedback only grading form the marks feature will not be present.

Student perspective
If you attach a grading form to a Turnitin assignment, your students will also be able to access this when they open their submission from the icon on the right side of their paper.
![]()
Sharing grading forms
You can share grading forms with other instructors. For more information about this, see our guide to importing and exporting Rubrics / Grading Forms.
You can access the Rubric Manager in the following ways:
No Submissions
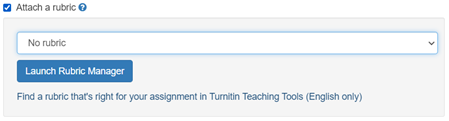
a. When creating a new Turnitin assignment or editing the assignment the settings
b. Select the Optional Settings section, select Attach a Rubric and the Launch Rubric Manager button.
b. Navigate to the Rubric Manager Menu

Via Feedback Studio if a student has submitted
a. When viewing a student's submission, select the blue rubric icon in the panel on the right and click on the cog icon.

b. Navigate to the Rubric Manager Menu
Next Steps see the guides on how to:
- Create a Marking Grading Form
- Create a feedback only Grading Form
- Modify a Grading Form
- Duplicate a Grading Form
- Attach a Grading Form
What do marking grading forms look like for Instructors?
a. When a marking enabled grading form is attached to a Turnitin assignment, it will appear in the feedback panel select the Rubric Icon (to the right of a student's paper).
b. The image below is showing an example of a grading form with marking enabled, with for each criteria marks are manually added, marks are added up automatically to show the total grade and personalised written feedback in the comments box can also be provided.

c. Applying a mark out of a specific mark (must total out of 100) for each criterion and this will add up to show the total in the overall score. Once marking is complete, select the Apply to Grade button and it will add the total mark.
d. Once the Feedback Release Date has passed, students will see both their marks and feedback.
Setting up a marking grade form
When creating your grading form in the Rubric Manager, you will need to enable scoring so that each criterion carries marks. In the example below, it shows the critical elements of setting up a grading from with marks. The highlighted text is the method of applying a score to each criterion:

Step-by-Step:
a. Launch Rubric Manager via the Turnitin setting cogs Optional Settings section.
b. Rubric Manager (opens in a new window)
c. Select the Menu (top left), select Create new grading form.
d. Name your grading form appropriately for later use.
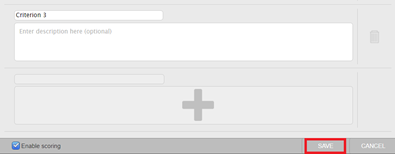
e. Each criterion is editable and can be renamed.
f. It is essential that you place the mark after the description to show the maximum marks for each criteria using parenthesis... type this into each comment box: (out of ## marks).
g. Enable scoring (check box bottom of form), this option must be selected to allow marks to be entered. Add more criteria using the plus (+) icon.
h. Save button stores your grading form in the Rubric Manager – ensure you do this after every edit.
i. Attach the marking grading form to the assignment using to drop-down link above the Launch Rubric Manager button.
- Tick Attach a rubric and click on the the drop down to see list of all available rubrics and grading forms in your library.
- Select your grading form from the Turnitin Rubric drop-down list.

- Click Submit at the bottom of the settings page.
Important: Detaching a grading form will remove existing scores and comments from the assignment.
If there are multiple tutors marking, ensure that none have started before removing.
Key points when creating a marked grading form
- Use each row for a criterion or question
- Clearly state the maximum mark for each criterion (e.g. “out of 10 marks”)
- Ensure the total across all criteria matches your marking scheme (e.g. 100 marks)
- Tick Enable scoring so markers can enter numeric grades
- Save the form before attaching it to an assignment or it will be lost
a. In the Turnitin assignment Optional Settings, select the button Launch Rubric Manager and a new window will open.
b. From menu (top left, three lines) choose Create new grading form.

c. Type a name for your grading form then click anywhere outside of the text field to save the title.
d. Enter your criterion titles and descriptions in each text field. You can use either plus icon to add more.

e. When you have finished setting up your grading form, click Save.
f. Close the Rubric Manager and add the Grading Form to the inbox using the drop down menu and select from the list. Save these settings for the assignment.
- Tick Attach a rubric and click on the the drop down to see list of all available rubrics and grading forms in your library.
- Select your grading form from the Turnitin Rubric drop-down list.
- Click Submit at the bottom of the settings page.
Important: Detaching a grading form will remove existing scores and comments from the assignment.
If there are multiple tutors marking, ensure that none have started before removing.
Important: You cannot edit a grading form that you have already started using with an assignment or one that has been shared with you.
a. Access the Rubric and Form Manager via one of the methods described in step 2 of this guide.
b. Click the menu icon at the top left of the Turnitin Rubric and Form Manager.
c. Use the drop-down list to select the grading form that you want to edit.
(NB: You cannot edit grading forms that someone else has shared with you).

d. Make your changes to the grading form.
e. When you have finished editing your form, click Save.
As you cannot edit a grading form once it is attached to an assignment, you may instead want to duplicate the form to edit and reuse elsewhere.
a. Access the Rubric Manager.
b. Click the menu icon, select the grading form that you want to duplicate from the list .
c. Click the menu icon again to reopen, ensure that the form you want to duplicate has a tick next to it and then click Duplicate.

d. Rename the copied grading form to avoid confusion with the original version. (remember to Save)
a. Open the submissions inbox for your Turnitin assignment, then click the cog icon at the top right.

b. Click on Optional Settings.
c. Tick Attach a rubric
d. Select your grading form from the Turnitin Rubric drop-down list.
e. Click Submit at the bottom of the settings page.
Important: Detaching a grading form will remove existing scores and comments from the assignment.
If there are multiple tutors marking, ensure that none have started before removing.
