
Leeds Beckett University - City Campus,
Woodhouse Lane,
LS1 3HE
MS Teams - run a meeting
This is a staff guide to using MS Teams to run online meetings.
IT Services have put together a large number of staff FAQs about MS Teams in the IT Self-Service Portal. Sign in, select Find an Answer, then search Teams.
Please note: you do not need a MS Teams site set up in order to use this meeting tool.
a.Click the Share button at the top of the meeting window.
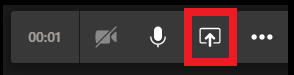
b. Select Desktop, Window, PowerPoint or Whiteboard.
- Desktop - to show your entire screen (warning - including notifications). If you have multiple monitors, you will need to select the screen you want to share.
- Window - to show just one window (without notifications). If you have multiple windows open you will need to select the window you want to share.
- PowerPoint - to show a PowerPoint presentation, click Browse to select a file. Note, this will let people move through your slides at their own pace, unless you click the eye icon next to the Stop presenting button.
- Whiteboard - to collaborate with others and make quick notes or sketches.
c. To stop sharing, click Stop presenting / sharing.
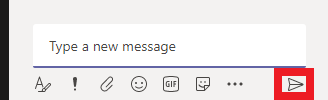
a. Click the Show conversation icon at the top of the meeting window.

b. A panel will appear on the right.
c. Type a message and click the Send icon.
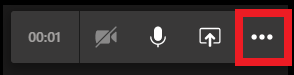
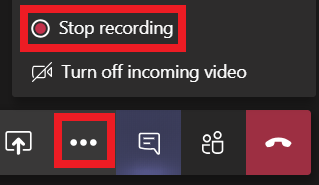
a. Click the three dots at the top of your online meeting.
b. Click Start recording. Everyone in the meeting will be notified that the recording has started.
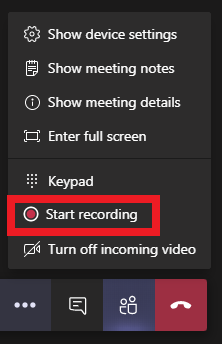
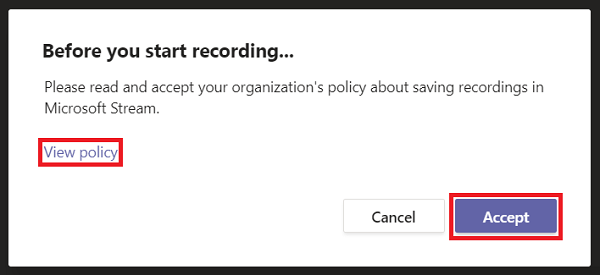
c. You may be prompted to read and accept the University's policy about saving recordings. Click View policy, then click Accept to confirm.
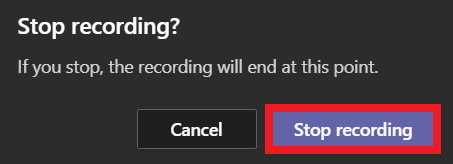
d. To finish the recording, click the three dots at the top of your online meeting, then click Stop recording. Confirm that you want the recording to end by clicking Stop recording when prompted. It may take a few minutes for the recording to process.
e. When the meeting has ended, you will find the recording in the chat area to download. To share the Teams recording with your students, you will need to upload it to Panopto in your MyBeckett module.
We strongly recommend that you follow our guidance to upload all Microsoft Teams recordings to Panopto (rather uploading the recording directly on MyBeckett due to file size, remove viewing permissions / restrictions and prevent loss of the recordings. This also ensures that your students can access the recording once embedded in modules and instructors can edit, add captions, share to other modules etc. as needed in the future.
There are three roles available in your online meeting:
- Organiser
- Presenter
- Attendee
This Microsoft guide explains the specific capabilities of each role.
To change roles during a meeting:
a. Click the Show participants button to open the People panel on the right of your meeting.

b. Hover over the name of the person whose role you want to change.
c. Click the more options (three dots) icon.
d. Select Make a presenter or Make an attendee.
a. Click the Show participants button to open the People panel on the right of your meeting.
b. At the top of the participants list, click Mute all. Note, you can also hover over an individual and click the three dots that appear next to their name to click Mute for that person, e.g. if there is a lot of background noise coming through their microphone.
c. Click Mute to confirm.
Please note, individuals are able to unmute themselves using the microphone icon if they need to talk.
Desktop app only
If you use a web cam during your online meeting, you can blur your background or apply a background effect.
a. Click the more button (three dots).
b. Click Show background effects.
c. Select an effect from the panel on the right. You can click Preview to try out the effect (without others seeing it), or click Apply / Apply and turn on video to switch on the background effect.
Desktop app only
Live captions are a preview feature available in English (US) via the MS Teams desktop app. Please note, live captions are not saved as part of meeting recordings.
Individuals who want to use live captions during an online meeting can switch them on for their own use.
Live captions will work best if one person speaks at a time.
To switch on live captions:
a. In your online meeting, click the more button (three dots).
b. Click Turn on live captions.
To switch off live captions:
a. Click the more button (three dots).
b. Click Turn off live captions.
Start a meeting as normal, the meeting organiser will now have access to the breakout rooms button on the meeting control bar.
Please Note: Difference of the breakout room icon on Windows/Mac
![]()
How do I make sure I can start using breakout rooms?
-
Make sure that the new meeting experience is enabled go to Teams -> Settings -> General -> Check “Turn on new meeting experience” (ITS can support you with this task)
-
Check and make sure you have the latest Teams updates (Update Microsoft Teams - Office Support)

a. Create Breakout rooms
Select Breakout rooms icon and choose how many rooms you would like. Select whether to automatically or manually assign your participants then select Create Rooms. To give each room a name, select the 3 dots ... next to each room, and select Rename room.
b. Assign Participants manually
Expand the list under assign participants then select participants by ticking the checkbox on each name (hover your mouse over each name). Select the 3 dots ... and choose a room from the list. Repeat until all participants are assigned.
c. Start breakout rooms
Select the 3 dots next to a room name, then Open room or select Open rooms to open all rooms at once Each room will change from closed to open status.
d. Breakout rooms in progress
To Join a breakout room, select the 3 dots next to the room, then Join. To return to the main meeting select 'Return'.
e. Send an announcement - to all breakout rooms
Select the 3 dots at the top of the breakout rooms menu, then Make an announcement.
f. Closing breakout rooms
To close a breakout room, select the 3 dots next to its' name, then Close room.
To close all rooms at once, select Close rooms.
g. Further information...
- You can have a maximum of 50 breakout rooms.
- Within breakout rooms, every participant can share content.
- Separate meeting chats are kept for each breakout room.
- The meeting organiser can interact with all chats.
- If a breakout room participant wants to get the attention of the meeting organiser, they can tag them in the chat using an @mention.
- If any recordings are made they will only be available to participants of the breakout room where they were recorded.
- Microsoft have promised that in future it will be possible to set more than one meeting organiser, to allow for greater control.
- Meeting organisers use the desktop client version of Teams, whereas participants can use either the desktop or mobile client, or even the web browser version.
h. Minimum Version Info...
- Minimum desktop app version: 1.3.00.24755 (released Sep 20)
- Minimum iOS build: 1.0.77.2020100603
- Minimum Android build: 1.0.0.2020091301
