Leeds Beckett University - City Campus,
Woodhouse Lane,
LS1 3HE
Schedule Collaborate Ultra sessions
Page last updated:
**IMPORTANT. The University intends to stop using the Collaborate Ultra service from 31 May 2024. Staff members who have used Collaborate in the 2022/23 academic year have been contacted with further information.**
This is a staff guide to setting up Collaborate Ultra session links and scheduling meetings within your module or course groups.
You are able to create a meeting link either within a content area or module menu. You only require one link and students and staff will enter the scheduler area where they can access the scheduled meetings from the list.
To help your students with navigation, you may choose to rename the Collaborate Ultra link to something more appropriate such as Lectures, Seminars or Online Meetings.
Some tips:
- You will only need to create one Collaborate link which will contain all Collaborate sessions, meetings and recordings
- Only those enrolled on the module will have access to meeting links and recordings, guests can be invited to attend but will not be able to access recordings etc
- Any scheduled meetings can be named/renamed when setting up e.g. Seminar, Lecture, Assignment brief etc
- Repeated sessions will be placed into a meeting folder that will need to be expanded to view scheduled meetings
- Any recorded meetings are stored in this area too
- The following guide explains how to create a Collaborate Ultra link from within a content area and schedule meetings
To create a link in the menu of your Module or Course Group follow these steps.
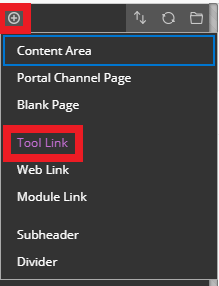
a. Click the plus icon top left of the menu
b. Choose 'Tool Link' from options
c. Select Collaborate Ultra and make it available to users. You can also rename this to something more appropriate such as - Online meetings, Seminar meetings and submit.
d. The new link will be placed at the bottom of your menu. Move the new link to show in the menu in the desired section by dragging it once the purple bar is visible.
The first step towards using Collaborate Ultra in a module or course group, is to create a ink to the Collaborate scheduler. You can either create the link in a content area or via the menu (see point 3).
a. In MyBeckett, open the module or course group content area where you would like to create a Collaborate link.
b. Click Tools.
c. Click More Tools (at the bottom of the drop-down menu).
d. Click Collaborate Ultra.

e. Name: Type a name for your link e.g. Webinars (this is how it will appear to students in the module content area).

f. When you click the link that you have created, the Collaborate scheduler will open. This contains a link to a 'Course Room' as well as the option to create new sessions and modify session options.
At the top of the Collaborate scheduler, you will find a link to a Course Room for your module or course group. This is an open Collaborate session that you or students can use at any date / time.

The Course Room link is available to everyone enrolled on your module or course group, or you can turn it off by selecting Lock course room.
After you have created a module or course group link to Collaborate, you can start to schedule your sessions.
a. Click the link that you created to access the Collaborate scheduler.
b. Click Create Session (choice of two create session buttons).

c. Type a name for your session.
d. On the Event Details tab choose the settings: (NB - these can be edited after you click create)
- Guest access: You can tick a box to enable Guest Access, if you need to invite external speakers.
- Start and end date/time: Select the start and end date and time for your session, or tick No end for an open session.

- Repeat: Tick if you would like to repeat the session on a recurring basis.
- Early entry: Use the Early Entry drop-down list if you would like students to be able to enter the session before the start time - default is set at '15 minutes before start time'.
- Description: You also have the option to type a description for the session, if you wish.

e. Click the cog at the top of the options pane to move to the Session Settings tab:
- Default attendee role: The default attendee role for students is Participant. We recommend leaving this as it is and promoting individuals to Presenter during the session if they need to share or present files.
- Recording: Select whether participants can download session recordings, and if chat messages should be anonymous.
- Moderator permissions: You can tick a box to only display profile pictures for moderators.

- Participant permissions: Select whether participants can share audio, video, post chat messages and draw on the whiteboard / files.
- Enable session telephony: You cannot change this setting once a Collaborate session has started. If you select Allow attendees to join the session using a telephone, then up to 25 attendees will be able to dial in.
- Private chat: By default, participants can send each other private chat messages during a Collaborate session. You have the option to switch this off so that participants can only send private messages to moderators, or you can select the option for moderators to supervise private chats.

- Allow 250+ attendees to join: If you tick this box to allow large sessions, participants won't be able to share audio or video during the session.
- Profanity filter: Chat panel (text only) If you switch on the profanity filter before a session, this will replace certain words with asterisks if typed into the chat panel. Click the clipboard at the top of the options pane to move to the Attendance Reporting tab.
- Share attendance with LMS: Tick this box if you would like to switch on attendance ;reporting for your session. You can then change the Late after, Absent after and Required time in session settings to meet your requirements.

f. Click Create.
g. Your session will be listed on the Collaborate scheduler page. Here are some examples of one-off scheduled and recurring meetings:


Some basic points for you to know, please also see our guide on Collaborate Recordings which includes more information which includes polls and recordings :
- All Recordings are found in the Collaborate Ultra meeting link by clicking on the top left burger menu from within Collaborate meeting link
![]()

- Recordings are only deleted if you choose to delete them via the settings for each individual session
- By default only recent recordings are listed (recorded within the last 30 days), to find previous recordings use the Filter By function (top right) to view Recordings In a Range, choose a date range

- All students on your module/course group can also access these recordings via the same top-left menu from within the meeting link
- Using the start and stop recording option in the Session menu creates a new recording from within the same session: When you select stop the recording ends. When you select start a new recording begins
- It should only take a few minutes for the recording to process and available for viewing by staff and students
- You are able to download recordings if needed. Instructors must change the meeting session (not in the recording area) to 'allow recording downloads' (in the meeting settings) to allow participants to download recordings

- If you want to post a recording in your module as a link, (such as if the Collaborate Meeting room scheduler link is hidden), you will need to change the recording setting to be viewable to the 'Public'.
NB: Only users that you share the link with such as in the module will have access.

- To share a recording to your module, click on the more icon in the recording list, select Copy Link and choose as a web link within your content area.

Check out the following guides:
