
Leeds Beckett University - City Campus,
Woodhouse Lane,
LS1 3HE
Create a question set
Page last updated:
This guide is for staff who want to create a question set in MyBeckett.
What is a question set?
A question set is a group of test questions from tests and pools that you have created within your module. You can choose how many questions from the set to present to students, and (if it's less than the total number of questions) it presents a random set of questions to students each time they sit the test.
Before you start
You will need to create at least one test or pool containing questions that you can include in your question set.
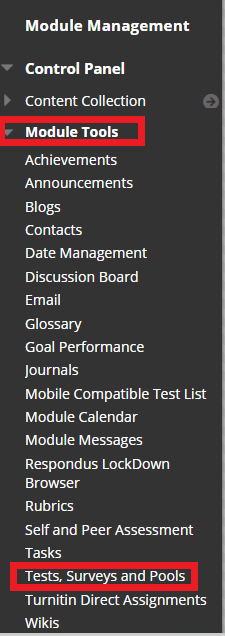
a. In the Module Management menu, click Module Tools, then click Tests, Surveys and Pools.
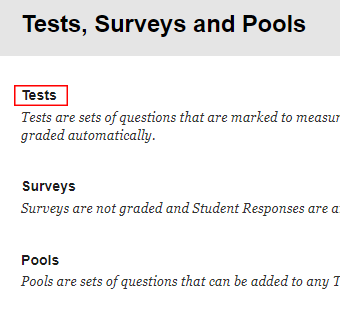
b. Click Tests.
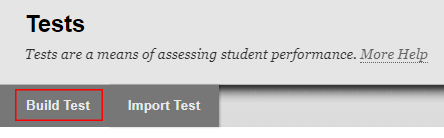
c. Click Build Test.
d. Under Test Information, type a Name and Description for the test, along with any Instructions for your students.
Note, if you plan to use question by question feedback, we have a standard description you can give your students which explains how they can view it:
"When your feedback is released by your tutor, you can view it by clicking Provisional Grades in the module navigation menu. Next, click the Test Name. This opens a screen displaying your attempts and marks. Click the mark you received and it will take you to the feedback you received for that attempt."
Important: You need to make the Provisional Grades link visible for students to access feedback. More information is available in our guide to releasing marks and feedback to students.
e. Click Submit. Next, you need to add some questions.
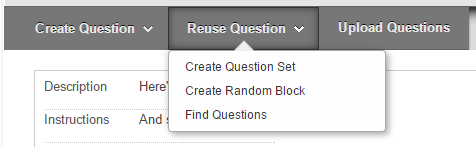
a. In your test canvas, click Reuse Question then click Create a Question Set.
b. Use the Browsing Criteria menu on the left to locate the test(s) or pool(s) that contain question you want to add to your question set. Note, you can also filter by question type, category, topic, level of difficulty or keyword.
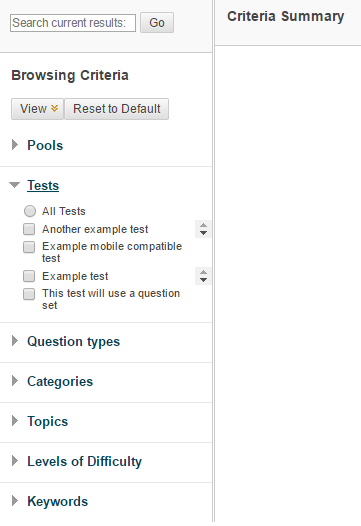
c. You can then select questions from each test or pool by ticking the checkbox to the left of each question. Note, if you select a test and it appears to be empty, it may be that it contains questions that are linked to another test.
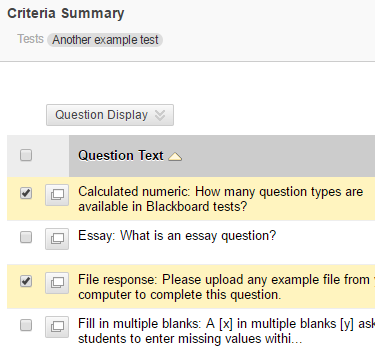
d. When you have finished selecting questions, click Submit.
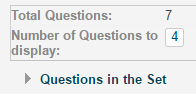
e. Type the number of questions to display in your test (e.g. 10). This means that the questions will be randomly selected from the set, so each student will see a different set of 10 questions.
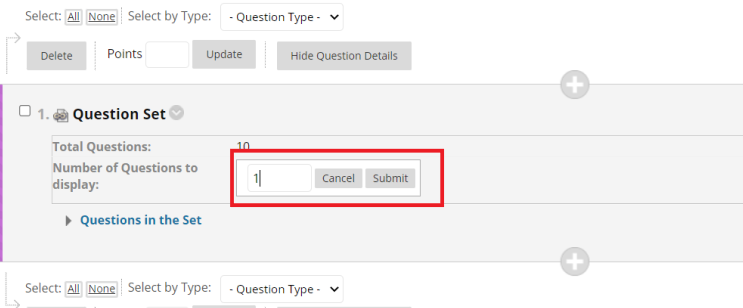
f. At the top right of your question set, type the number of points you want to allocate per question.
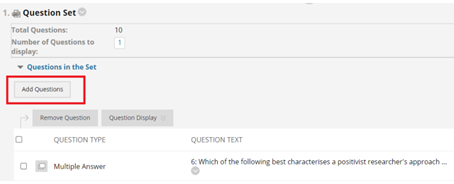
g. To manage the questions in your set, click Questions in the Set. This will expand your available options so you can add or remove questions.
h. To add questions within the question set select the option Add Questions. This will bring up the Browsing Criteria once again where you can select more questions to add to your set.
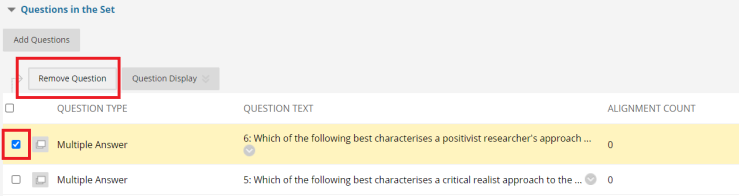
i. To delete questions within your set, check the box to the left of the question you wish to delete and select Remove Question option. Upon selecting this you will see a box appear select ok to proceed to action this deletion.
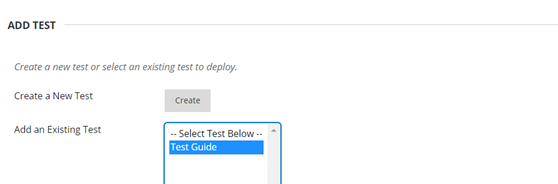
a. In a content area, hover your mouse over Assessments and click Test.

b. Under Add Test, select your test. Click Submit.
c. Adjust the test settings:
Important: Please read our online exam guidance if you're creating a summative exam.
- Test Availability Options that you can choose include making the test available, adding an announcement for the test, allowing multiple attempts, forcing completion of the test in one sitting, setting a timer for the test, setting a date range for the test, and password protecting the test
- Test Exceptions: If you need to provide different options for specific users or module groups, you can add them to the exception list. For example, for students who are allowed more time to take tests
- Due Date: You can set a due date for the test, with the additional option of preventing students from starting the test once the due date has passed
- Self-Assessment Options: Choose whether to include or hide scores in Grade Centre
- Show Test Results and Feedback to Students: Decide when to show results to students, whether to include question scores, the answers you want to show, whether to include feedback and incorrect questions
- Test Presentation: Decide whether you want to show the test questions All at once or One at a Time. You can also use tick boxes to Prohibit Backtracking and Randomise Questions
d. Make the test available to students by clicking Yes next to Make the link available.
e. Click Submit.
