
Leeds Beckett University - City Campus,
Woodhouse Lane,
LS1 3HE
create groups from timetable seminar groups
This guide provides instructions on how to create groups in MyBeckett with the same members as seminar groups on the timetable.
Follow the steps below:
a. Access the Timetable and click on the relevant seminar in the calendar.
b. Click View Attendee Details and the list of members in the seminar group will open.
c. Click Export and a CSV file will download.
b. Open the file and convert the student c number by eliminating the most significant digit e. g 7 at the left most position and place the letter c there (Tip: Use Concat function in Excel).
c. Copy that column of student IDs that now looks like c1234567 to a new Excel file and save in CSV format (simple CSV; ignore other variants).
a. In MyBeckett Module Management section, click on Users and Groups and then select Groups.
b. Hover over Create send click on Manual Enrol (under Single Group).
c. Give it a name and under Tool Availability select the tools by checking the boxes e.g File Exchange and Discussion Board (Tip: Give it a simple and short name).
d. Untick Allow Personalisation
e. Click Submit (the sub-group will be created with no members just yet).
f. Click on View Options and select Show Group Code.
g. The group code column will appear, showing the code.
h. Note down this code.
a. Open the CSV file that has list of student c numbers.
b. Copy the group code against each student c number such that Column 1 is group codes and Column 2 is c numbers.
c. Caution: Make sure it is the same group code is against each student ID. There is no increment in last digits. For example, Group_gc_1 can become Group_gc_2 in the next row and then Group_gc_3 in the following row and so on until the end it becomes Group_gc_22. This will corrupt the entire process.
d. Save the file in CSV format.
a. In MyBeckett under the Module Management menu click Users and Groups then Groups.
b. Click Import.
c. In the Import group members section click Browse Local Files and select the saved CSV file that has the list of student c numbers and group code.
d. In the Tools Availability section select the tools for this group.
e. Click Submit.
f. The system will take some to confirm the action by email notification.
g. Refresh the group page and note the number of members. This number must match the number of students in the CSV file.
a. More than one group can be created by attaching one file only.
b. Create the groups corresponding to the seminar groups; for example, create 4 groups for 4 seminar groups in the timetable. (See Create groups section above for instructions).
c. Each group will have a different group code.
d. Note them all down.
e. Create c numbers. (See Export members section above for instructions).
f. Put the groups code against student c numbers for each group.
g. Repeat the above for each seminar group.
h. Combine them all so there are only two columns, one for groups and other for c numbers.
i. Caution: Make sure each c number from one seminar group matches with their corresponding group code. Any wrong copy/paste will corrupt the result.
j. There must be only one CSV file with only two columns containing the record of all seminar groups.
k. Follow the instructions in the section above named Import group members.
l. Once the Import groups is complete, all groups must show the same number of members as tagged in the seminar groups. Note: Tutor's name is also listed in the seminar group record. Do not count that by mistake.
This section of the guide shows you how to send an email to separate seminar groups.
Things to note:
- No copy of the email will be created, so if you intend on sending the same email to other groups - make a note of your message in NotePad or Word.
- Students will be able to reply to each other and to your message via email in Outlook.
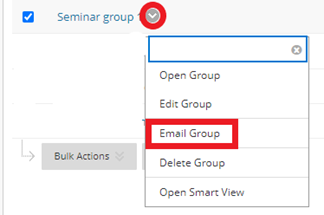
a. Navigate to the Module Management section of you module and click on Users and Groups, select Groups.
b. You will see the list of seminar groups, click on the action link to the group you want to email.
c. Select all students in the group and press the the right arrow to move them into the selected boxes (these are the recipients).
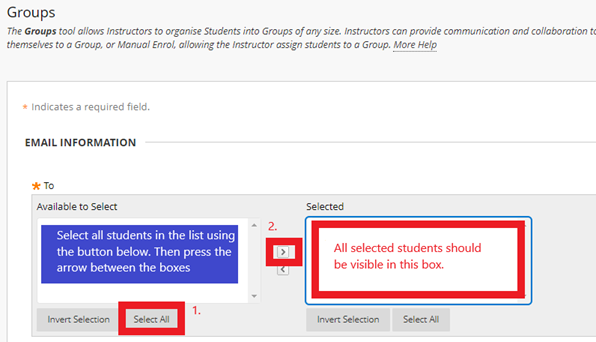
d. Give your email a title and then type you message and send. Only the students in the group will receive the email.
You may find these links to related guides useful:
