
Leeds Beckett University - City Campus,
Woodhouse Lane,
LS1 3HE
Set up a workbook template
Page last updated:
This guide is for staff creating a workbook template for students to complete in PebblePad.
A PebblePad workbook is a structured, interactive resource that can guide students through learning activities and assessments. This guide will show you how to set up a new Workbook manually - however, you may find using PebblePad's AI Workbook Generator tool more useful and straightforward for simpler Workbook structures, details for which can be found here. For more complex structures, please continue to follow the guidance below.
Workbooks combine a range of input functionality, including:
- Text – headings, instructions, and explanatory content.
- Images – to illustrate concepts or provide visual guidance.
- Videos – embedded to support learning or provide demonstrations.
- Hyperlinks – linking to external websites or other PebblePad/online resources.
- Text fields – for either short or long written responses, with longer responses allowing students to format text and include links or images.
- Tables and rubrics – for structured responses or recording information.
- Checklists – for self-assessment or tracking completion of tasks.
- Rating scales – for self-evaluation or feedback activities.
- Date fields – for recording key dates.
- Evidence upload fields – enabling students to attach files, images, audio, video, or existing PebblePad assets as supporting evidence.
When you have created your workbook and you are happy with the settings, you can use ATLAS to release it to students.
a. Log in to PebblePad (see our guide for help).
b. Click the menu icon (three lines) at the top left of the screen.

c. Click Get Creative, then click Create a Workbook.

d. Click create manually. You now have three options for your new workbook:
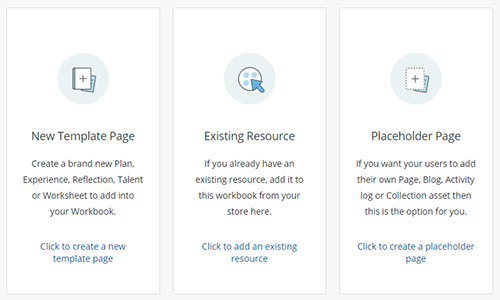
- New Template Page: Use this option to create a new page in your workbook.
- Existing Resource: This allows you to add other PebblePad assets (e.g. pages) to your workbook. The assets will be linked, so be aware that any changes that you make will affect the original asset.
- Placeholder Page: You can use this option to insert a blank page that students can replace with an asset. You can choose the type of asset that you want students to add (page, blog, activity log, collection).
If you have created new template pages in your workbook, you will probably want to add content for your students to interact with, such as information to read, or areas to enter text and attach evidence to their work.
a. To rename the new page, click the cog icon on the page tab. Select the existing text and type the new name for your page.

b. You can replace the banner at the top of the page by clicking Replace Image, then you can select or upload a different image.
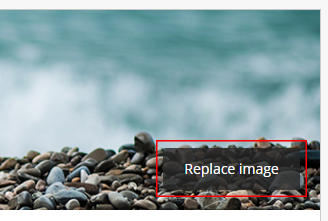
Note, by default students can select their own banner image. You can change this setting by clicking Properties at the top right of the page, then Template. The first item in this list is about Banner options.
c. Click Add Content at the top of the page. You can then select the type of content that you want to add.

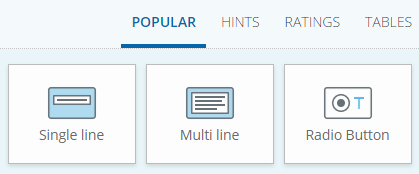
d. Click on a content category:
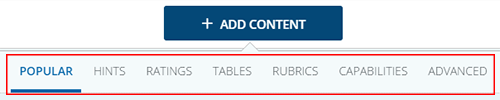
- Popular: This category includes frequently used interactive form fields, such as text boxes, radio buttons and date pickers.
- Hints: You can add text, images, videos and audio to provide information for students using your template.
- Ratings: Interactive form fields. Binary allows students to select one answer from two choices. Likert and Numeric allow students to select an option from a scale. If you would like students to justify their choice, please use the Capabilities category instead.
- Tables: You can insert tables with different layouts, such as column labels only. Students can type in the empty table cells.
- Rubrics: This category includes a rubric template that you can populate with criteria and scales.
- Capabilities: Interactive form fields that students can use to provide and justify evidence of skills development and experience.
- Advanced: Options in this category include Digital Signature and Media Picker.
e. Click on a content item in the category you have chosen. It will appear at the bottom of your page.
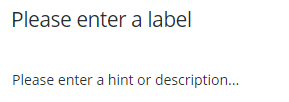
f. Complete any labels, hints or descriptions for the content item.
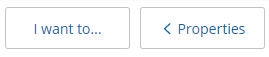
g. When you have selected a content item on your page, click Properties at the right of the screen, then click Block to edit further details.

Please note that not all Block options are available in every content type (see our Additional Content Options in section 4 of this guide):
- In-field hints: This option allows you to display hints/descriptions within a field.
- Hints on asset view: Leave this selected to display hints/descriptions when previewing your workbook.
- Show empty fields in view: Leave this selected to display empty fields when previewing your workbook.
- Include evidence: You can tick this checkbox to add an evidence element to student content items.
- Privacy state: If the content item is for assessors, select To be completed by assessor. The private and confidential options are for student fields.
- Mandatory for progress: You can tick this checkbox if you require students to fill in the field before they can complete the page.
- Duplicate block: You can click this button to create a copy of the content item with the properties you have set up.
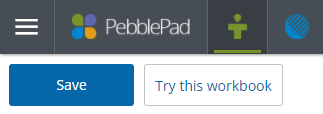
h.Save your workbook using the button at the top left. The first time you save, you will be prompted to name the workbook.
Note, unlike other asset types, if you close your workbook and want to reopen it for further editing, it will be located in your Resources Store.
Workbook settings affect all pages in your workbook, template settings affect individual pages.
To edit your workbook settings (for all pages in your workbook):
a. Open your workbook, then click Properties at the top right of the page.
b.Click Workbook

c. You can change settings including:
- Usage: Specify whether your workbook is for single use only, or a number of reuses.
- Cascade tags: If you have added tags to your workbook, you can tick Cascade tags to ensure that these tags remain attached to your students' copies of the workbook too.
- Progress tracking: Tick this option if you would like students to mark each page as complete.
d. Save your workbook using the button at the top left.

To edit the settings for individual pages:
a. Navigate to the page in your workbook that you want to edit.
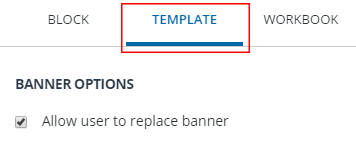
b. At the top of the Properties panel, click Template.

- Banner options: You can use this setting to control whether students can change the banner image at the top of each page in your workbook.
- Category: The default category for workbook pages is worksheet. You can change this if necessary using options from the list.
- Page release: This controls whether the current page is always displayed, or whether it will be released at a later date.
- Page locking: This allows you to lock the page so that students cannot edit after
- Reuse pages: If you want to reuse the page in other assets, you can tick to make it visible in your Assets Store.
- Page reordering: You can click Reorder current page to change the order of the pages tabs within your workbook.
- Preferred options for new elements: You can switch on settings that will apply to new content items that you add.
c. Save your workbook using the button at the top left.
a. Click the plus icon at the top of the workbook to add a new page.
b. Click Placeholder Page.
c. Choose the type of asset that you want students to add (page, blog, activity log, collection).
- Page: Normally for text content, with potential to embed images.
- Blog: For multiple posts organised horizontally.
- Activity log: Similar to blogs with a record of time spent on activities.
- Collection: A way of gathering assets based on criteria e.g. a particular tag.
d. Depending on the type of placeholder page that you chose, you will be presented with different options to set this up.
- Pages and blogs have fields that you can use to add instructions for your students, explaining what you would like them to use the page or blog for.
- Activity logs and collections prompt you to choose whether you are going to define criteria or if you would like your students to do this themselves.
When your workbook template is ready, you can make it available to students via the Resources Store by following the steps in our Add a resource guide.
Additional content options
- Word count: Allowing you to set a minimum or maximum word count.
- Display horizontally: Available for radio buttons and checkboxes, if you want to change from a vertical list.
- Hide unselected options: You can hide the radio buttons, checkboxes and dropdown options that a student did not select. This applies when viewing the workbook.
- Include time: You can add the time in addition to the date.
- Caption rollover: Available for images and videos. Not available on mobile devices.
- On clicking image: Available for images. You can link to a website or asset if required.
- Video controls: Available for videos. You can set a video to play automatically when the page loads, and loop the video if required.
- Audio controls: Available for audio. You can set the audio to play automatically when the page loads, and loop the audio if required.
- Likert increments: Available for likert scales. You can include up to 20 increments on a scale.
- Numeric range: Available for numeric scales. You can set a to and from value (with a difference of no more than 20).
- Table dimensions: For tables and rubrics, you can change the number of rows and columns.
- Repeating rows: Available for the column labels only table option. This means a new row is added automatically every time a student fills in an empty row.
- Number of cells: Available for the individual cell table option. You can specify how many table cells to include in this content area.
- Number of cells per row: Available for the individual cell table option. You can specify how many table cells are included per row.
- Verification: Available for the digital signature content option. You can use this setting to require students to add their name/email when signing a workbook.
- Editing the asset: Available for the digital signature content option. You can determine what will happen if a student tries to edit the workbook after they have added a digital signature (e.g. display a warning, remove the signature, lock the workbook).
- Media picker types: Available for the media picker content option. Select at least one content type that students can upload to this content area (image, video, audio, document).
