Leeds Beckett University - City Campus,
Woodhouse Lane,
LS1 3HE
Create sub-groups
Page last updated:
You can create groups of students in your module or course communities to allow students to collaborate on projects, assignments, create sign-up sheets or other types of group work.
If you need to create a number of groups to match your pre-defined seminar groups, the most efficient way of doing this is to import the sub-groups and members via CSV files. Templates are available for this process.
- Once sub-groups are created, a link will display to students at the bottom of the module menu called My Groups
- Teaching staff access sub-groups via Users and Groups
You can enable certain tools (at any time after creation) and easily set up group Blackboard assignments; one student submits and all members in the sub-group will see the grade and feedback.
The following tools can be enabled to be used by both staff and students within each sub-group:
- Blackboard Assignment - One student submits for all in their group, grades/feedback visible to all members of the group
- Email - allows students to communicate with each other in same group
- Discussion Board - only visible to each other in same group, with option to grade
- Tasks - Project management
- File Exchange - Collaborate with group members and instructors (NB: anyone in the group can delete any file)
- Blogs - Share knowledge and experience
- Journals - Activity Logs
- Wikis - Collaborate with group members, edit and view group wiki. Instructors can view, edit with the option to grade
Use this method if you need to create multiple sub-groups.
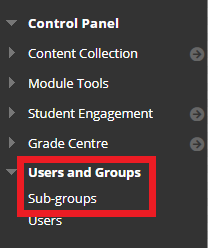
a. In the Control Panel, click Users and Groups then Sub-groups.

b. Hover over Create, then under Sub-group Set choose an enrolment option (self-enrol, random or manual).

c. Type a Name for the group, this is a required field.
d. Type a Description for the group. This is an optional field but may help students to understand what the sub-group is for.
e. Select Yes to make it available. If you are creating a self-enrol sub-group, you also have the option to select Sign-up Sheet Only (this means that the group will be available after all members have signed up).
f. Choose the group's Tool Availability by ticking boxes. We recommend only choosing tools that you definitely want students to use (you can enable any of the tools later). If you're marking them on their contributions using the tools you've chosen, select the Grade: Points possible option and mark out of 100.
g. Untick Allow Personalisation. This prevents students from adding their own tools or accidentally removing something vital.

h. The next options will differ depending on whether you are creating random, manual or self-enrol.
Random enrol: Set the Membership options.
Determine Number of Sub-groups by, You can select:
- Number of Students per Group: number of groups will be automatically determined
- Number of Groups: will be automatically determined
Determine how to enrol any remaining members.
For example: If you have 51 students in ten groups of five, one student needs to be put in a group. You wouldn't put that student in their own group as the only member. However, if you had 54 students, you might put four students in their own group.
If you Distribute the remaining members amongst the sub-groups, one group would contain six students.

Self-enrol: Complete the Sign-up Options section, including a name and instructions, the maximum number of members, and whether students should be able to see the names of others in the group. Tick Allow students to sign-up from the sub-groups listing page. Enter how many groups you want to create.
Manual enrol: Enter how many groups you want to create. You can add members after you have set up the groups.

j. Tick Create Smart View for this group. More information is available in our Smart View guide.

k. Click Submit.
Use this method if you need to create a single sub-group, choose either:
- Self-enrol ideal for activity or event sign-up sheets
- Manual enrol ideal to match a seminar group
a. In the Control Panel, click Users and Groups then Sub-groups.

b. Hover over Create, then under Single Group, choose an enrolment option (manual or self-enrol).

d. Type a Description for the group. This is an optional field but may help students to understand what the sub-group is for.
e. Select Yes to make it available. If you are creating a self-enrol sub-group, you also have the option to select Sign-up Sheet Only (this means that the group will be available after all members have signed up).
f. Choose the tool availability by ticking boxes. We recommend only choosing tools that you definitely want students to use, which can be added later. If you're marking the students' contributions using the tools you've chosen, select the Grade: Points possible option and mark out of 100.
g. Untick Allow Personalisation. This prevents students from adding their own tools or accidentally removing something vital.
h. Tick Create Smart View for this group. For more information, see our smart views guide.
i. The next options will differ depending on whether you are creating a self-enrol or manual.
Self-enrol: Complete the Sign-up Options section, including a name and instructions, maximum number of members, and whether students should be able to see the names of others in the sub-group. Tick Allow students to sign-up from the sub-groups listing page.
Manual enrol: Click Add Users and tick the boxes next to the students that you want to add. When you've selected all group members, click Submit.
j. Click Submit to finish set up.
Instructors can export a CSV file containing their existing groups to reorganise offline if needed, and then import them to the module.
To export existing groups.
a. In the Control Panel, click Users and Groups then Sub-groups.

b. Click Export.

c. Select Sub-groups Only and tick Include Header Row.

d. Click Submit. You will receive an email containing a link to download a .zip file. This file can be edited to reorganise groups and members and then imported.
To reveal existing Group Codes
Groups codes are unique identifiers used strictly for import purposes. You can reveal a column in your module that will list all Group Codes.
a. In the Control Panel, click Users and Groups then Sub-Groups.
b. Hover over View Options and click Show Sub-group Code.

c. A new Sub-Group Code column will appear containing all group codes.
a. In the Control Panel, click Users and Groups then Sub-groups.
b. Click Import.

c. You will need to populate two CSV files, one for Sub-groups and one for the members. Templates can be downloaded by clicking More Help.

d. Click both links and the example files will be downloaded to your computer.

- Members file will be called sample_groupmembers.csv
- Sub-groups file will be called sample_groups.csv
e. Open the sample_groups.csv file and fill in all the relevant columns. Please note: The Sign Up Instructions columns are only relevant to self-enrol sub-groups, e.g. Choose a time slot (only one).
f. Save your updated CSV file but keep it open for now (save it somewhere you will find it, to upload when you have completed the following steps).
g. Open the members CSV file (called sample_groupmembers.csv in your downloads folder).
This contains two columns, for Group Code and User Name.

h. In the User Name (column B), paste a list of student c numbers. (If necessary you can download a list of usernames from Grade Centre).
i. In the Group Code column (column A), you will need to add the group code for the Sub-group that you want to add each student to. Copy and paste the group codes from the sample_group.csv file that you just created.
j. Save your updated members CSV file.
To import your CSV files:
In the Control Panel at the bottom left of your module, click Users and Groups, then Sub-groups.
b. Click Import.
c. In the Import Sub-group Members section, click Browse Local Files and select your sample_groupmembers.csv file.

d. In the Import Groups section, click Browse Local Files and select your sample_group.csv file.

e. In the Tool Availability section, tick the tools that you want to make available in your Sub-groups.

f. Click Submit.
g. When you refresh the sub-groups page, your new sub-groups should be listed, with the number of members indicated in the Enrolled Members column.
h. You can click the action link to the right of a sub-group name and click Edit Group if you want to change settings or membership for an individual group.

When you have created a sub-group it will by visible at the bottom of the menu as My Groups - you may also add a link to the module menu for specific Sup-Groups if you have set up others.
a. In Edit Mode, click the plus icon at the top left of the module menu.
b. You will need to follow this guide on how to create a Tool Link from the list of options.
d. Give the Tool Link the appropriate name for the group and select the Tool Type: Sub-groups (drop-down menu).

e. Tick Available to users, so that the menu link is visible to learners.

f. Click Submit. The link will appear at the bottom of the module menu, you can move this by hovering over it, and clicking and dragging the double-headed arrow.
You can create a Smart View to provide a focused look at the Grade Centre, showing the columns that match the criteria that you have set. Smart Views are useful when you want to quickly find data from a long list of students.
a. In Edit Mode, click Users and Sub-groups from the Module Management menu (bottom left).
b. Click Sub-groups.
c. Click the action link to the right of the Sub-group that requires a Smart View, then click Create Smart View.

d. A confirmation message will appear in a green bar at the top of the screen.

e. To add the Smart View as a quick link so it appears below Grade Centre in the Module Management menu, click Grade Centre, then Full Grade Centre.
f. In Grade Centre, click Manage, then Smart Views.

g. Find your sub-group in the list of available Smart Views and click the star icon to add the sub-group as a favourite.
h. A link to the sub-group Smart View will appear in the Module Management menu.
This section of the guide shows you how to send an email to separate groups.
Things to note:
- No copy of the email will be created, so if you intend on sending the same email to other groups - make a note of your message in NotePad or Word.
- Students will be able to reply to each other and to your message via email in Outlook.
a. Navigate to the Module Management section of you module and click on Users and Groups, select Groups:
b. You will see the list of groups, click on the action link to the group you want to email.
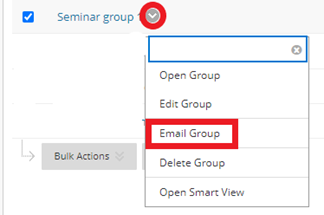
c. Select all students in the group and press the the right arrow to move them into the selected boxes (these are the recipients).
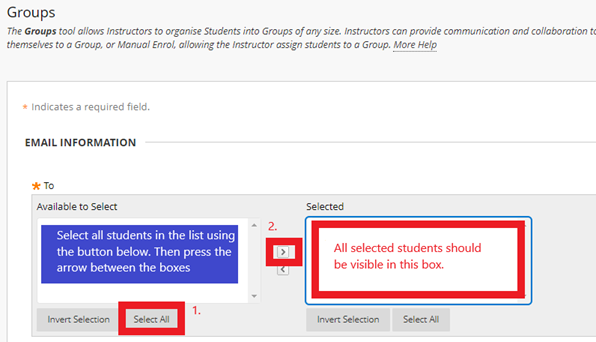
d. Give your email a title and then type you message and send. Only the students in the group will receive the email.
You may find these links to related guides useful:
