
Leeds Beckett University - City Campus,
Woodhouse Lane,
LS1 3HE
Module navigation menu
Page last updated:
The module navigation menu is on the left of the MyBeckett interface.
This is the menu that students will use to navigate the various sections of your module and tutors can organise resources to suit. It is set up with some default links to useful tools and resources.
When you click on a link in the module navigation menu, it will either:
- Open up a website or file in a new tab in your web browser or
- Open up a corresponding tool / content area in the centre of your module
You can edit the module menu by adding, renaming, deleting or hiding items.
Following best practice, with a consistent experience across the University, we review and update the default module menu every year. For example, we have added the following sections and alert staff of these updates via newsletters.
✔ Notifications: Academic staff feedback indicated that colleagues wanted more efficient communication options. This section can be used for notifications, announcements, and module community discussion boards. This is by default the Homepage (module entry point) and can be changed if you prefer following the change the Homepage guide.
✔ Module Content:& To provide structure to students include your module content in this section, with a separate content area for each week.
✔ Assessment: Queries indicate many students are unsure where to find information about assignment submission, particularly Turnitin and resources relating to Academic Integrity / referencing / citation. Include your assignment information and submissions folders within this section to ensure consistency across modules. The staff/student guides to setup and submission are also included as default.
✔ Learning Resources: We’ve included some links to resources that students may find useful; add any others relevant to your module to this list.
You can customise the module navigation menu to provide links to the content within the course.
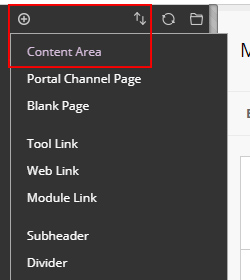
a. Hover your mouse over the plus icon on the navigation menu, then click one of the options. In this guide, we'll create a Content Area.
![]()
b. Click Content Area
c. Type a Name and click the tick box to make it Available to Users.
d. Click Submit. Students won't see the content area until you add some content. For more information on content areas, follow this Create a Content Area guide.
Key to menu icons:
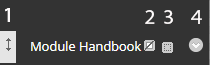
- Move the menu item
- The menu item is hidden from students
- The menu item is empty
- Drop-down menu of actions
a. To rename a menu item, click the action link (circle with a down arrow) then click Rename Link.
![]()
b. You can also choose to 'delete' or 'hide' a menu item so students cannot see it.
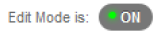
Before starting, turn Edit Mode ON
a. In your module, hover over the + icon at the top left of the Module Navigation Menu, then click Content Area.
b. Type the Name of the Content Area e.g. Week 2 - Topic 2. If you want students to see the content, tick the Available to Users box and click Submit.

c. The new content area appears at the bottom of the Module Navigation Menu. Hover your mouse over the double arrow, then click and drag

d. For more information about organising your Module Navigation Menu, view our guide
