Leeds Beckett University - City Campus,
Woodhouse Lane,
LS1 3HE
Create a Blackboard assignment | Ultra

Page last updated:
This staff guide will show you how to create a Blackboard assignment in your Ultra module.
The Blackboard assignments tool allows you to create assignments, view student submissions and mark and provide feedback online.
When should I use a Blackboard assignment?
Blackboard assignments are different to Turnitin assignments, in that they don't provide Similarity Reports.
You can use a Blackboard assignment when you need students to submit:
- files larger than 40Mb
- URLs
- file formats that are not supported by Turnitin.
a. In the module navigate to content area you would like to add a Blackboard assignment and click the plus icon.

b. Click Create.
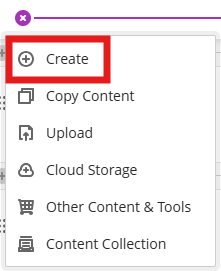
c. In the Create Item panel click Assignment and the new assignment page will open.

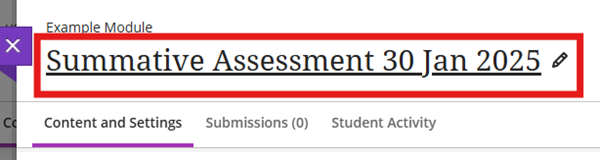
d. Enter a Title, make it descriptive so students can easily find it within the module content.
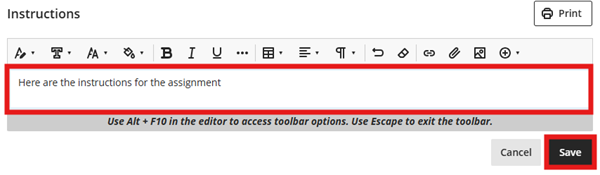
e. Add student instructions to the Instructions box and click Save.
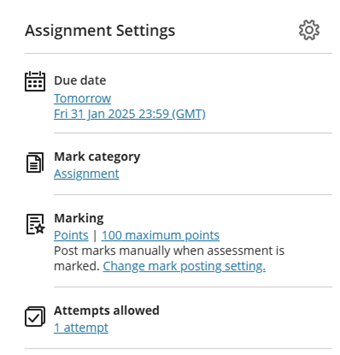
f. Some default settings will have been applied to the assignment, you can view these in the Assignment Settings panel. You can amend any of these settings by clicking on the relevant link. See the next section of this guide for all assignment settings.
Students cannot see an assignment until you choose to show it.
a. Locate the assignment within the module content page.
b. Click the Hidden from students link.
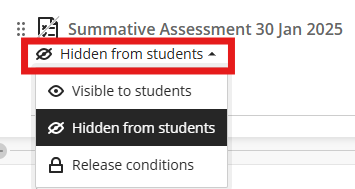
c. Select Visible to students.
d. You can also control the visibility of content items using the following Release conditions:
- Release content by module groups
- Release content by date
- Release content based on performance
More information is available in our Release Conditions guide.
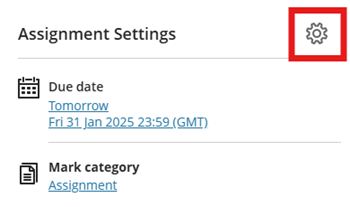
Either when creating or editing a Blackboard assignment, access the assignment settings by clicking the Assignment Settings (cog icon).
a. Go to Grade Centre List view.
b. Select the Blackboard Assignment link to open it.
c. Navigate to the Content and Settings tab across the top, to select the Assignment Settings cog (top right). This will open the side panel to apply specific settings for the assessment.
The following is a detailed explanation of the specific assignment settings that are available.
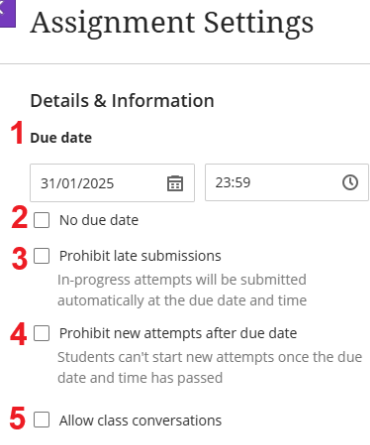
Due Date (#1) - Set the due date and time using the clock tools or type into the boxes.
No due date (#2) - Use for open ended assignments.
Prohibit late submissions (#3) - If selected, in progress attempts will be submitted automatically at the due date.
Prohibit new attempts after due date (#4) - We recommend to prevent students from beginning a new attempt after the due date, specified accommodations are still honoured.
Allow class conversations (#5) - allows students to raise questions about the assignment. See Class Conservations guide.
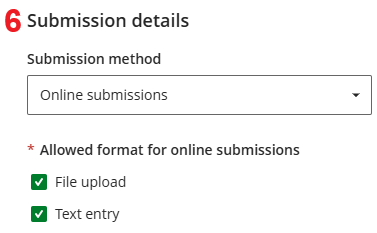
Submission method (#6)- allows you to choose the submission method (online or offline)
- Online allows you to select which formats the students can use to submit their assignment and accepts multiple file uploads but can be prevented by selecting Text entry.
- Offline is used to mark work that does not require a submission, e.g. oral presentation delivered in person. Name the Offline assessment to be easily identifiable for markers and students. This assignment option will create a column in Grade Centre Grid view and marking will be easily entered via the List view in Grade Centre. The submission date can be selected per student based on their actual assessment day. More information in Blackboard's offline submissions guide.
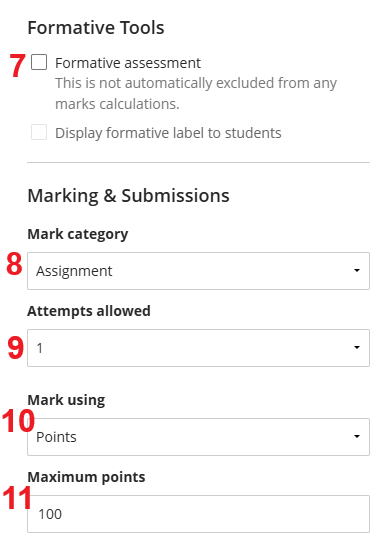
Formative Tools (#7) - choose whether to label the assignment as Formative and whether to display this to students. You can also use the Formative Filter in Grade Centre.
Mark category (#8) - assignment is selected by default. You can add a new category for Turnitin or identify offline assessments. This makes it easier to identify in the Grade Centre Grid View Filter.
Attempts allowed (#9) - select the number of attempts that students are allowed. If multiple attempts is selected you can select how the final mark is calculated.
Mark using (#10) - select the appropriate schema.
Maximum points (#11) - the default is 100.
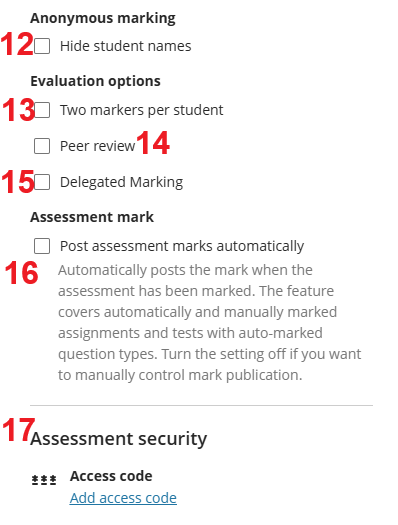
Hide students names (#12) - tick this option to apply anonymous marking, this is not available for groups assignments.
Two markers per student (#13) - tick to enable parallel marking and assign markers.
Peer review (#14) - tick to enable Peer review which allows students to review their peers' work.
Delegated marking (#15) - tick to enable delegated marking and assign markers.
Post assessment marks automatically (#16) - untick in order to release marks manually when ready via Post Marks in Grade Centre.
Access code (#17) - allows you to generate a code for students to enter before taking the assessment. This code is generated automatically by the system.
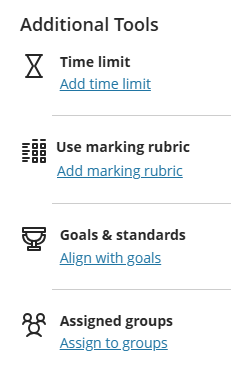
Additional Tools to customise your Blackboard assignment via the Settings cog. At a glance these are:
Add Time limit
- Adding a time limit can keep students on track and focused on the assignment.
- Each student has a limited amount of time to submit.
- The assignment attempts are saved and submitted automatically when time is up
- Allow students to work past the time limit for all students to work after the time limit expires. When the initial time expires, tell students that work submitted after the initial time limit may receive partial credit (the options are: +50% /+100% / unlimited extra time)
- Time limits can only be added to individuals, not a group assignment
- On marking there is a blue indicator that shows 'PAST TIME' (top right)
Add marking rubric
Choose between a feedback only no-points or a points-based marking rubric. These need to be created using Blackboard Rubrics
Align with goals - this tool is currently not in use at Leeds Beckett University
Assign to groups
Create an assignment for one or more module groups. You will need to have completed the set up of Creating Groups
What are Blackboard accommodations, exceptions and exemptions?
- Accommodations allow students to have individual assessment due dates or time limits for all their assessments within the module. Accommodations can be applied via the Class Register (see below) or Grade Centre.
- Exceptions allow instructors to grant students alternative due dates, extended access or additional attempts for a specific Blackboard assignment or test. Exceptions can be applied via Grade Centre, please see the relevant section in the Grade Centre Guide.
- Exemptions allow instructors to exempt a student from completing an assessment. Exemptions can be applied via Grade Centre, please see the relevant section in the Grade Centre guide.
The following shows you how to add Accommodations via the Class Register:
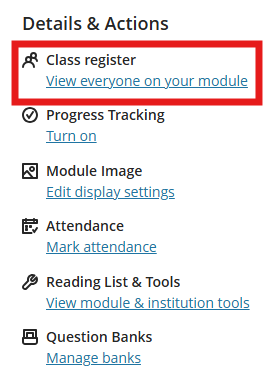
a. Locate the Class Register in the module menu and click the View everyone in your module link.
b. Locate the student you wish to add accommodations for, click the 3 dots and select Accommodations.
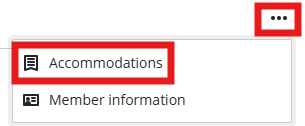
c. In the Accommodations panel you can add the following accommodations:
- Due Date - students will never have their work marked as late
- Time limit - you can select unlimited or specify the percentage of extra time needed
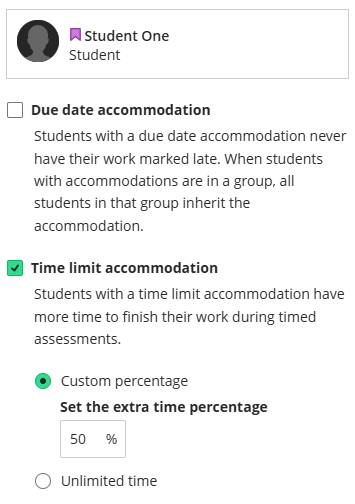
d. When finished click Save and the Accommodations panel will close. If you add a time limit accommodation after students have started submissions, you will see a pop up warning that time limits for previously submitted work will update, click Add to continue.
e. In Grade Centre and the Class Register the student's name will now show a purple ribbon icon to indicate an accommodation has been set. This is only visible to instructors.
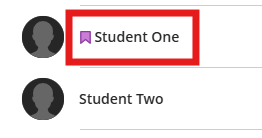
See Blackboard's guide to accommodations for more information.
Double marking assignments (two markers per student)
Blackboard assignments have an option for “two markers per student”, which can be used for double / parallel marking. This can be useful if you want to distribute the marking workload across more than one marker.
Key information:
- Instructors on the module can be given the role of marker or reconciler.
- Markers are randomly assigned to students. It is not possible to allocate specific markers to students using this option. Markers can only view the submissions that have been randomly assigned to them by the system.
- Markers will not see each other’s marks, feedback comments or annotations. They mark the same submission independently, in parallel.
- Students will not see the marks, feedback comments or annotations that markers have added. They will only see the marks, feedback comments or annotations that are added by a reconciler.
- Reconcilers then review the marks and assign the final mark for the submission. It is possible to have more than one reconciler but they cannot also be a marker on the assignment.
Delegated marking
Blackboard assignments can be set up for delegated marking, in which instructors are allocated submissions to mark based on marking groups that you have set up in the module. This is useful for sharing the marking workload for large cohorts and workflows in which you need to assign student submissions to specific supervisors or tutors.
Key information:
- The marking groups must be set up before you can enable delegated marking.
- Delegated marking works with one marker per submission.
- If you require a double marking workflow (being able to provide two marks per submission before the marks are reconciled), the “two markers per student” option may better suit your needs.
- If you assign more than one marker to the same group of students, only one marker can mark the submission but they can all add annotations and feedback comments to the same box.
- Markers can only view the submissions that have been assigned to them. They can only post marks for the group they have been assigned.
- Unassigned instructors can view all submissions and post marks for all students on the module.
What if I want to assign specific markers for a double marking workflow?
In Blackboard assignments, the “two markers per student” (double/parallel marking) option and the delegated marking option cannot be selected at the same time.
This means that instructors have a choice to either:
- Use double marking with a random assignment of submissions.
- Or, use delegated marking to assign specific students to markers, but only one marker will be able to add a mark and the assigned markers will be able to view each other’s feedback comments and annotations.